
QBittorrent with Gluetun
Set up QBittorrent with Gluetun for a secure torrenting experience.
Welcome to part 2 of our series on setting up an automated media server using Docker. In this part, we’ll be setting up QBittorrent, a popular torrent client, and configuring it to work with Gluetun, our VPN container from part 1.
What is Torrenting?#
Torrenting is a method of file sharing that allows users to download and upload files in a decentralized manner. Instead of downloading a file from a single server, torrenting breaks the file into smaller pieces and downloads them from multiple sources simultaneously. This makes it faster, more efficient, and more resistant to takedowns or censorship.
Why Use a VPN for Torrenting?#
Using a VPN (Virtual Private Network) while torrenting is essential for protecting your privacy and security. A VPN encrypts your internet traffic, making it difficult for anyone to monitor your online activities. This is especially important when torrenting, as your IP address can be exposed to other users in the swarm, potentially leading to legal issues or unwanted attention from copyright holders.
Objectives#
- Install QBittorrent in a Docker container
- Route all QBittorrent traffic through the Gluetun VPN container
- Test IP address
- Setup automated port forwarding updates
Installing QBittorrent#
As in Part 1, we’ll be using Docker Compose to set up QBittorrent. Open your existing docker-compose.yml file and add the following code:
services:
  gluetun:
    ports:
      - "8888:8888/tcp"                         # Gluetun Local Network HTTP proxy
      - "${GLUETUN_CONTROL_PORT:?err}:${GLUETUN_CONTROL_PORT:?err}" # Gluetun Status Port
      - "${WEBUI_PORT_QBITTORRENT:?err}:${WEBUI_PORT_QBITTORRENT:?err}" # WebUI Portal: qBittorrent

## QBITTORRENT ##
  qbittorrent:
    image: lscr.io/linuxserver/qbittorrent:latest
    container_name: qbittorrent
    restart: unless-stopped
    volumes:
      - ${FOLDER_FOR_DATA:?err}/qbittorrent:/config
      - ${FOLDER_FOR_MEDIA:?err}:/data
    environment:
      - TZ=${TIMEZONE:?err}
      - WEBUI_PORT=${WEBUI_PORT_QBITTORRENT:?err}
      - PUID=1000
      - PGID=1000

## Do Not Change Network for qBittorrent
## qBittorrent MUST always use a VPN / Secure Internet connection
network_mode: "service:gluetun"Let’s break down the new parts of this configuration:
ports#
We added a variable for the Qbittorrent Web UI port. We’ll fill this in in our .env file later
qbittorrent#
- We added the latest image from linuxserver.io ↗. They maintain Docker images of popular software.
- Under
volumes, we added a new volume mount for a media folder. This will be where we store all of our torrents and downloaded files. - We set the port we exposed in the Gluetun container to the internal WebUI port and passed in user and group IDs 1000. This will make sure the container has the correct file permissions when it reads and writes.
- The
network-modeof the container is set toservice:gluetunthis lets the Gluetun container handle all traffic to and from qBittorrent
Updating Our .env File#
Before we start our containers, we’ll need to add a few environment variables to our .env file. In the same directory as your docker-compose.yml, open your .env file and add the following:
TIMEZONE=America/Chicago
FOLDER_FOR_MEDIA=/media/plex  # The directory on your host machine to store torrents and media
FOLDER_FOR_DATA=./data

# Gluetun
...

# Ports
WEBUI_PORT_QBITTORRENT=8120

# QBittorrent
QBITTORRENT_USER=admin # Change this to whatever you want your login to be
QBITTORRENT_PASSWORD=password # Change this to whatever you want your login to beNow that we’ve got our .env file configured, we should be able to run our docker-compose.yml file. In the same directory, run:
docker compose up -dYou should see your Gluetun container rebuilding (we added new env variables to it) and the QBittorrent container pulling from linuxserver.io. When it’s finished, open a web browser to your Docker machine’s IP (or localhost if you’re on the same machine), port 8120.
Upon new installation, the default username and password are shared in the logs. You can view the logs by running:
docker logs -f qbittorrentOnce you have the default credentials, you can login on the WebUI and change the password to what you defined in your .env file. This can be done through the settings button (gear) and choosing the WebUI tab.
Automatic Port Updates#
If you see a fire symbol at the bottom of your QBittorrent screen, it means you’re firewalled by your VPN provider and need to connect via the correct port. This happens from time to time as the port your VPN provider exposes changes.
To automatically update the port, we’ll use a container called gluetun-qbittorrent-port-manager. The Github can be found here ↗ if you’d like to check out the code.
Updating docker-compose.yml#
Add the following container to your docker-compose.yml file:
services:
  ...
## QBITTORRENT PORT MANAGER ##

  qbittorrent-port-manager:
    image: snoringdragon/gluetun-qbittorrent-port-manager:latest
    container_name: qbittorrent-port-manager
    restart: unless-stopped
    volumes:
      - ${FOLDER_FOR_DATA:?err}/gluetun/temp:/tmp/gluetun # set this as the same you used for tmp on the gluetun container
    environment:
      - QBITTORRENT_SERVER: localhost
      - QBITTORRENT_PORT: ${WEBUI_PORT_QBITTORRENT:?err}
      - QBITTORRENT_USER: ${QBITTORRENT_USER}
      - QBITTORRENT_PASSWORD: ${QBITTORRENT_PASSWORD}
      - PORT_FORWARDED: /tmp/gluetun/forwarded_port
      - HTTP_S: http
network_mode: "service:gluetun"Run:
docker compose up -dOnce the container is up, go back to the QBittorrent UI and you should see the fire symbol replaced by a green globe. This means traffic is flowing to QBittorrent and your port is open.
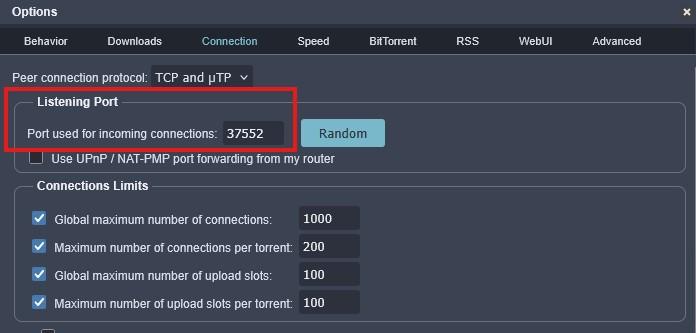
You can manually check that the port is correct by going to the settings menu and choosing the “Connection” tab. The port should be the same as the one in the forwarded_port file under ./data/gluetun/temp/.

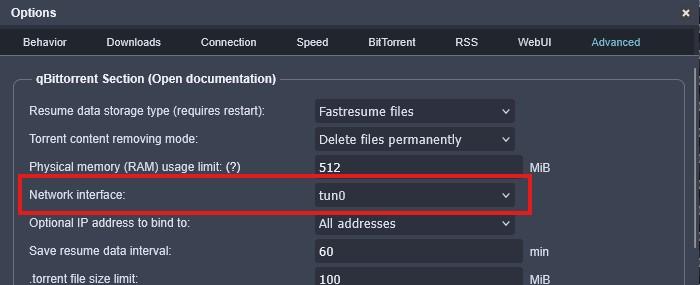
We’ll also want to update the network interface to exclusively use tun0 in the Advanced tab. This will allow us to reconnect to the VPN if the connection resets.

Testing Torrenting IP#
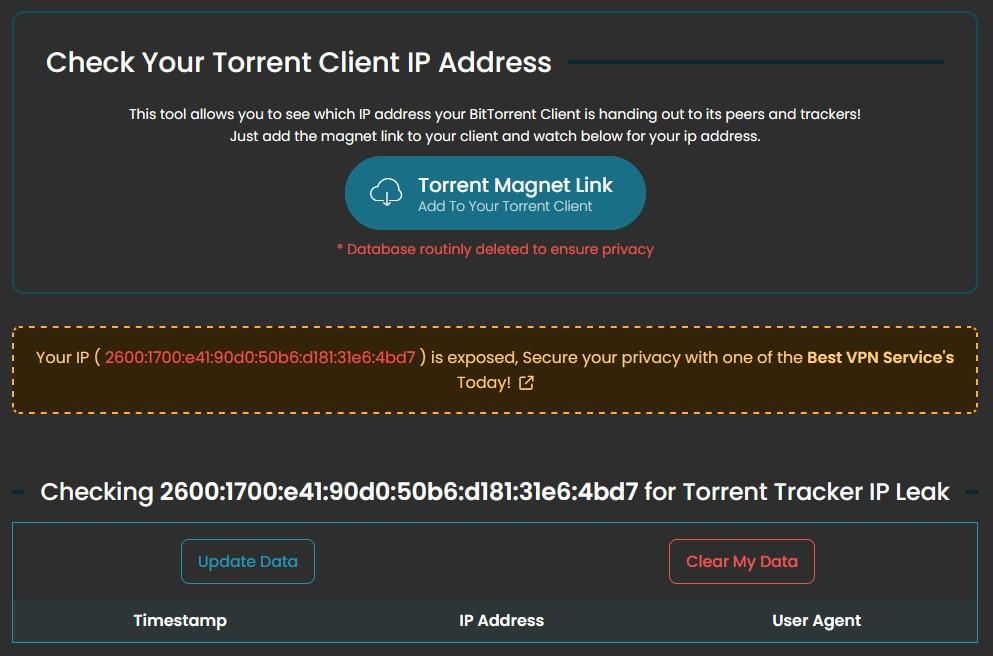
To test that our VPN is correctly routing our QBittorrent traffic, we can download a test torrent and check our IP from the web. We’ll use whatismyip.net ↗ for this.

- Right click the “Torrent Magnet Link” button and copy link address
- Open QBittorrent and click the “Add Torrent Link” button (it looks like a link in the top left corner)
- Paste the link you copied and click “Download”
- Return to WhatismyIP.net and click “Update data” if nothing is in the box.
If everything is working correctly, you should see the IP address of your VPN provider.

If you see your real IP address, something is wrong. Consult the logs of your Gluetun container to see if there are any errors. You can view the logs by running:
docker logs -f gluetunDo not continue until you see the correct IP address on the tool.
You’re free to delete the test torrent from your QBittorrent client. It was just to test the IP address and didn’t download anything to your computer.
Conclusion#
Congratulations! You’ve successfully set up QBittorrent with Gluetun. You can now download torrents securely and privately. In the next part of this series, we’ll be setting up the *arr stack to automate your media downloads.